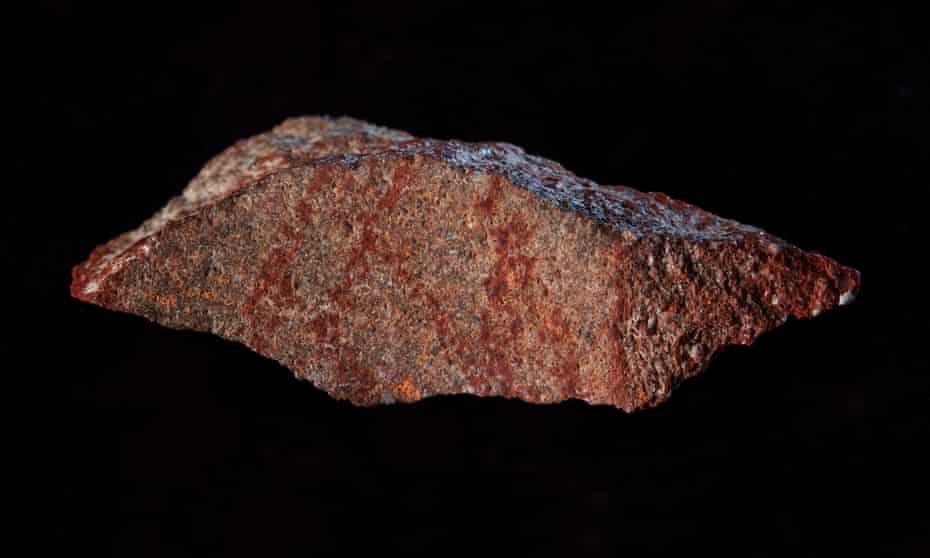
The Codex Rotundus

Great Post on the Codex Rotundus from Book Addiction UK:

Jessica's avatarBookAddiction

Codex Rotundus 3 fac

The manuscripts and codices which survive from the late 15th century are often large and lavish affairs and usually conform to certain norms in terms of shape. But this curious and unusual little gem, which takes its name ‘Codex Rotundus’ from its unique shape, measures just over 9 centimeters across and is circular.  Its 266 pages are bound along a spine just 3cm long, so small that three clasps are needed to help keep it closed.  Thought to have been rebound in the 17th century, the original clasps which help hold the tiny codex together, were reused. As so many of the manuscripts from this period, it is a devotional text -a lavishly illuminated Book of Hours in Latin and French.

Codex Rotundus 1 fac

Remnants of a coat of arms, which a subsequent owner appears seems to have tried to obliterate, in the first initial ‘D’ suggests that it was created for Adolf of Cleves…

View original post 253 more words

Inuit Genealogy

reblogging johnfass

johnfass's avatarfevered imaginings

Currently working on a research project related to Canadian and Greenland Inuit with R0gMedia in Berlin. The diagram above is a genealogical diagram made in the mid 1950s by anthropologist Jean Malaurie, the first of its kind. It’s a hand made radial drawing, Malaurie has a whole series of them in his apartment in Paris, along with his extensive personal archive of research materials including photos, films, notebooks, drawings. While the broader aims of the project are to find an institution willing to host the collection, I’m trying to make an digital artefact out of this diagram that could bring the information alive and demonstrate how historical anthropological materials can be made relevant and contextualised for present and future generations. DIS2012 published a paper on this project for a workshop about slow technology. Slow technology DIS2012

View original post

Installing Arnold Single License Server Model flexnetserver Systemon an Apple Mac OS Render Farm.

As of version 5.0.1 Arnold requires that the license server is using the Autodesk flexnetserver system instead of the RLM system previously used by Arnold.

I have just switched the render farm over to this system and had some trouble getting all the required information I needed in one place as many instructions have a certain amount of assumed knowledge.

So here is various instructions gathered from different parts of the Autodesk support site and placed in ONE list, with a few comments and additions here and there from myself.

1. Download the installer

https://knowledge.autodesk.com/support/maya/downloads/caas/downloads/content/autodesk-network-license-manager-for-mac-os-x.html

This will be installed on the server computer.

You will need to be on Apple macOS High Sierra 10.13, Apple macOS Sierra 10.12 or Apple Mac OS X El Capitan 10.11.


2. Reveal the hidden folders and documents in your Finder

You will need to do this to be able to see some of these folders where the installation is taken place.

  1. Open Terminal found in Finder > Applications > Utilities.
  2. In Terminal, paste the following: defaults write com.apple.finder AppleShowAllFiles YES.
  3. Press return.
  4. Hold the ‘Option/alt’ key, then right click on the Finder icon in the dock and click Relaunch.


3. Obtain a license from Autodesk

You can do this by logging into your account on Autodesk.com and going to “Manage Products and Downloads” and selecting “Generate A Network License File”from the Arnold drop down menu.

It’ll ask for the MAC address and name of your machine.

You can get the MAC address by going to System Preferences, click on NETWORK, choose WIFI from the list of connections, then click on Advanced and then select Hardware.

The MAC Address is displayed here.


4. Install the flexnetserver software on your server

In Finder, go to the Downloads folder and double-click nlm11.14.1.3_ipv4_ipv6_mac_universal.tar.gz

In Finder, double click nlm11.14.1.3_ipv4_ipv6_mac_universal.pkg to run the installer

Copy your license file to /usr/local/flexnetserver

I had trouble with this as my admin did not have permission to look inside the “usr” folder.

So, post intsallation, I moved the flexnetserver folder onto the root of my Hard Drive. Consequently I had to adjust all subsequent addresses from  /usr/local/flexnetserver to /flexnetserver.


5. Start the Server

Open a terminal

Start the license server. Copy this line of text and paste it into the terminal window. Then press ENTER

/usr/local/flexnetserver/lmgrd -c /usr/local/flexnetserver

(in my case Where the first address is the location of the flexnetserver file and the second is the location of the license file.)

This is the command that run to start the license server after you restart the computer.


6. Test the Status

Type this into a terminal window.

/usr/local/flexnetserver/lmutil lmstat -a -c /var/flexlm/adsk_server.lic

Where the first address is your flexnetserver adress (see above) and the second is the location of your license file.


7. Convert any text files you make into PlainText

In TextEditor go to “format” and select Make Plain Text.


8. Set up the Server so that it automatically restarts.

  • Copy the contents below and save the file on the Desktop and call it: profile.txt
/usr/local/flexnetserver/lmgrd –c /usr/local/flexnetserver/adsk_server.lic  –l /var/flexlm/adsk_server.log
(Note: the above command assumes that your Autodesk software license file name is adsk_server.lic and is located in /var/flexlm/ folder.  If your license file name and location is different, please adjust the command accordingly.  The same assumption is made regarding debut log file, /var/flexlm/adsk_server.log.)
  • Open a Terminal and type: 
cd $HOME
  • Type the following and the file will be moved from your Desktop to your HOME directory and renamed:
mv Desktop/profile.txt .profile
  • Type the following and confirm that there is a .profile file in the folder:
ls -la
  • Go to System Preferences > Users & Groups.
  • Select your user and finally Login Items.
  • Click the + symbol on the bottom. In the dialog window, click on the search bar on top-right and type “Terminal“. Double click on the correspondent result. Eventually, Terminal will be added in the Login Items list as shown below:
  User-added image
  • Reboot your computer and if this shows up in the Terminal, it’s working.  You can also open the Activity Monitor (View > All Processes) and confirm that the adskflex and lmgrd are running.
​ User-added image

9. Creating the Environment Variable for the Client Machines.

Make sure that you correctly set the  ADSKFLEX_LICENSE_FILE variable:

An Environment Variable is needed for Arnold to verify where to pull a license from. This needs to be done on the workstation where MtoA will run.

Use a text editor to create a flexlmrc.txt file. Its content should look like this, except with the name or IP address of your license server:

ADSKFLEX_LICENSE_FILE=@MY_SERVER_HOSTNAME_OR_IP


If the license server is on the same machine as Arnold, 
your flexlmrc file will look like this:
ADSKFLEX_LICENSE_FILE=@localhost

Save the txt file anywhere on your machine. Open a Terminal window and type open ~ (Mac) or nautilus ~ (Linux) to open your Home folder, then drag and drop your flexlmrc.txt file there.
Then type  cd ~ to move your terminal to the Home folder.
Finally type mv flexlmrc.txt .flexlmrc (Mac) or mv flexlmrc .flexlmrc (Linux) to make the file a configuration file.

This file can now be copied to the Home folder of the other machines in your farm.


That’s it. Run a simple test and check for watermarks.

From Errol Morris, a list of 10 things you should know about truth & photography

1. All photographs are posed.

2. The intentions of the photographer are not recorded in a photographic image. (You can imagine what they are, but it’s pure speculation.)

3. Photographs are neither true nor false. (They have no truth-value.)

4. False beliefs adhere to photographs like flies to flypaper.

5. There is a causal connection between a photograph and what it is a photograph of. (Even photoshopped images.)

6. Uncovering the relationship between a photograph and reality is no easy matter.

7. Most people don’t care about this and prefer to speculate about what they believe about a photograph.

8. The more famous a photograph is, the more likely it is that people will claim it has been posed or faked.

9. All photographs are posed but never in the same way.

10. Photographs provide evidence. (The question is of what?)

via kottke