As of version 5.0.1 Arnold requires that the license server is using the Autodesk flexnetserver system instead of the RLM system previously used by Arnold.
I have just switched the render farm over to this system and had some trouble getting all the required information I needed in one place as many instructions have a certain amount of assumed knowledge.
So here is various instructions gathered from different parts of the Autodesk support site and placed in ONE list, with a few comments and additions here and there from myself.
1. Download the installer
This will be installed on the server computer.
You will need to be on Apple macOS High Sierra 10.13, Apple macOS Sierra 10.12 or Apple Mac OS X El Capitan 10.11.
2. Reveal the hidden folders and documents in your Finder
You will need to do this to be able to see some of these folders where the installation is taken place.
- Open Terminal found in Finder > Applications > Utilities.
- In Terminal, paste the following: defaults write com.apple.finder AppleShowAllFiles YES.
- Press return.
- Hold the ‘Option/alt’ key, then right click on the Finder icon in the dock and click Relaunch.
3. Obtain a license from Autodesk
You can do this by logging into your account on Autodesk.com and going to “Manage Products and Downloads” and selecting “Generate A Network License File”from the Arnold drop down menu.
It’ll ask for the MAC address and name of your machine.
You can get the MAC address by going to System Preferences, click on NETWORK, choose WIFI from the list of connections, then click on Advanced and then select Hardware.
The MAC Address is displayed here.
4. Install the flexnetserver software on your server
In Finder, go to the Downloads folder and double-click nlm11.14.1.3_ipv4_ipv6_mac_universal.tar.gz
In Finder, double click nlm11.14.1.3_ipv4_ipv6_mac_universal.pkg to run the installer
Copy your license file to /usr/local/flexnetserver
I had trouble with this as my admin did not have permission to look inside the “usr” folder.
So, post intsallation, I moved the flexnetserver folder onto the root of my Hard Drive. Consequently I had to adjust all subsequent addresses from /usr/local/flexnetserver to /flexnetserver.
5. Start the Server
Open a terminal
Start the license server. Copy this line of text and paste it into the terminal window. Then press ENTER
/usr/local/flexnetserver/lmgrd -c /usr/local/flexnetserver |
(in my case Where the first address is the location of the flexnetserver file and the second is the location of the license file.)
This is the command that run to start the license server after you restart the computer.
6. Test the Status
Type this into a terminal window.
/usr/local/flexnetserver/lmutil lmstat -a -c /var/flexlm/adsk_server.lic
Where the first address is your flexnetserver adress (see above) and the second is the location of your license file.
7. Convert any text files you make into PlainText
In TextEditor go to “format” and select Make Plain Text.
8. Set up the Server so that it automatically restarts.
- Copy the contents below and save the file on the Desktop and call it: profile.txt
/usr/local/flexnetserver/lmgrd –c /usr/local/flexnetserver/adsk_server.lic –l /var/flexlm/adsk_server.log
- Open a Terminal and type:
cd $HOME
- Type the following and the file will be moved from your Desktop to your HOME directory and renamed:
mv Desktop/profile.txt .profile
- Type the following and confirm that there is a .profile file in the folder:
ls -la
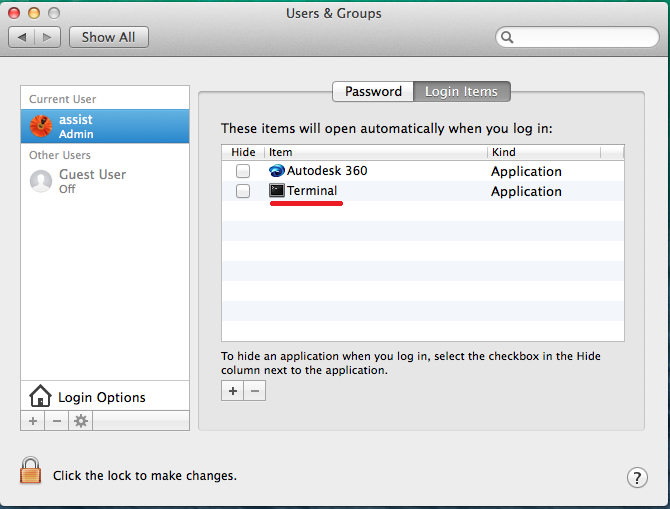
- Go to System Preferences > Users & Groups.
- Select your user and finally Login Items.
- Click the + symbol on the bottom. In the dialog window, click on the search bar on top-right and type “Terminal“. Double click on the correspondent result. Eventually, Terminal will be added in the Login Items list as shown below:
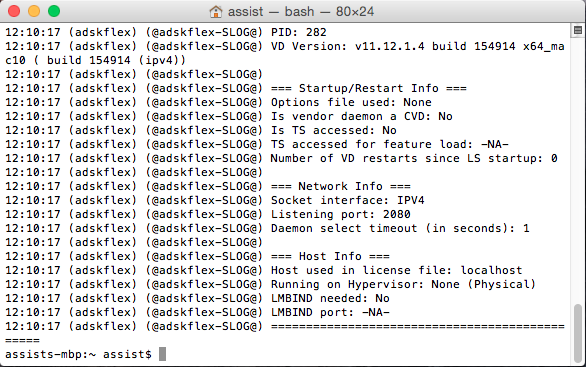
- Reboot your computer and if this shows up in the Terminal, it’s working. You can also open the Activity Monitor (View > All Processes) and confirm that the adskflex and lmgrd are running.
9. Creating the Environment Variable for the Client Machines.
Make sure that you correctly set the ADSKFLEX_LICENSE_FILE variable:
An Environment Variable is needed for Arnold to verify where to pull a license from. This needs to be done on the workstation where MtoA will run.
Use a text editor to create a flexlmrc.txt file. Its content should look like this, except with the name or IP address of your license server:
ADSKFLEX_LICENSE_FILE=@MY_SERVER_HOSTNAME_OR_IP
If the license server is on the same machine as Arnold, your flexlmrc file will look like this:ADSKFLEX_LICENSE_FILE=@localhost
Save the txt file anywhere on your machine. Open a Terminal window and type open ~ (Mac) or nautilus ~ (Linux) to open your Home folder, then drag and drop your flexlmrc.txt file there.
Then type cd ~ to move your terminal to the Home folder.
Finally type mv flexlmrc.txt .flexlmrc (Mac) or mv flexlmrc .flexlmrc (Linux) to make the file a configuration file.
This file can now be copied to the Home folder of the other machines in your farm.